Databases
The Database Browser
Setting up a connection to your database is the best option for larger datasets or datasets that change over time. To open the Database Browser, from the homepage, click New > Dataset > Connect.
The Database Browser lets you create a database connection and explore tables that you can then load into a session.
Connect to a Database
DataChat supports the following database systems:
- BigQuery
- Databricks
- MicrosoftSQLServer
- MySQL
- PostgreSQL
- Presto
- Snowflake
- Redshift
- ConnectionString
If you're working from DataChat's cloud platform and are connecting to a read-only database that's behind a firewall, refer to Identity-Aware Proxy Setup for more information on allowing access to read-only databases.
Database Types
- BigQuery
- Databricks
- MicrosoftSQLServer
- MySQL
- PostgreSQL
- Presto
- Snowflake
- Redshift
- ConnectionString
If you're using a service account to connect to BigQuery, follow these steps before connecting in DataChat:
Create a service account
- In the Google Cloud Console, go to IAM & Admin > Service Accounts.
- Click Create Service Account.
- Enter a name (e.g., datachat-access) and click Create.
Assign BigQuery Permissions
In the Grant access section, add the following roles to the service account:
BigQuery Data Viewer. Grants read access to a specific tables or views.BigQuery Job User. Grants permission to run jobs at the dataset level.
If you plan to use BigQuery ML, ensure the account has the following permissions:
bigquery.jobs.createbigquery.models.createbigquery.models.getDatabigquery.models.updateDatabigquery.models.updateMetadatabigquery.models.delete
For more information on BigQuery ML permissions, see Google Cloud's documentation.
Download the Key File
- In the Service Accounts list, click the name of your new account.
- Go to the Keys tab, then click Add Key > Create new key.
- Select JSON and click Create. The file will download automatically. Keep this file secure as it won’t be downloadable again.
To access BigQuery via OAuth, refer to Enable Database OAuth.
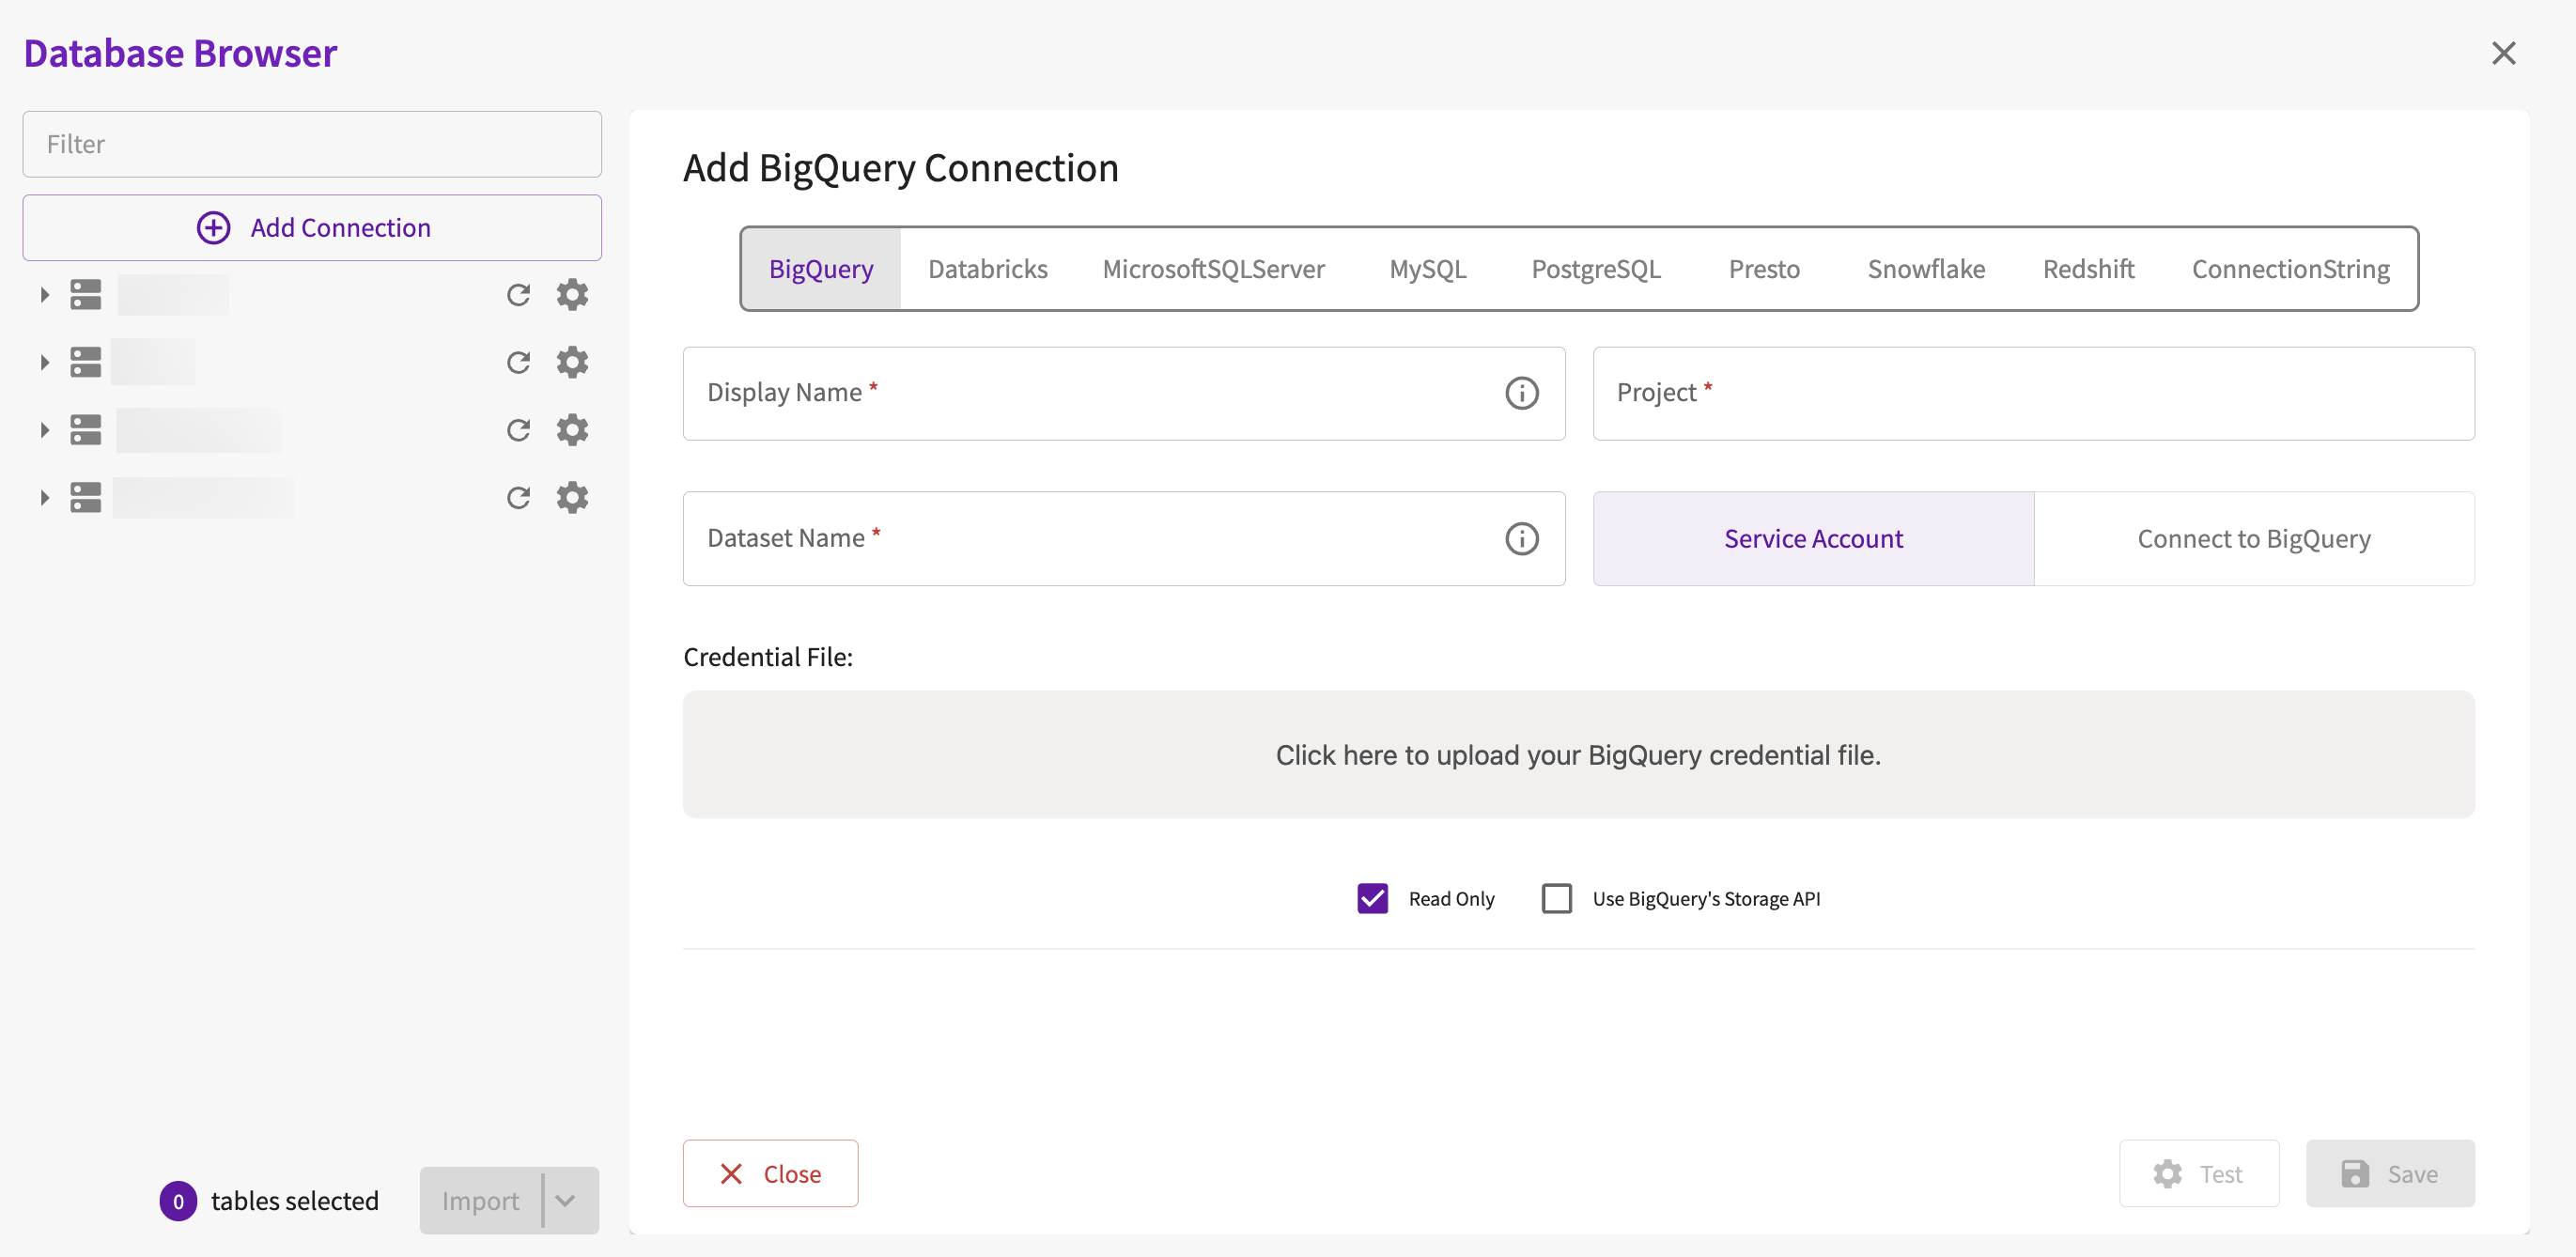
To add your BigQuery database:
- Give the database a display name. This is how you'll reference the database across DataChat.
- In the Project field, enter the name of your BigQuery project.
- In the Dataset Name field, enter the name of your BigQuery dataset.
- Select whether this connection will use a service account or connect to BigQuery via OAuth.
- If this connection uses a service account, upload your key file.
- Optionally, set the database to be read-only.
- Optionally, enable using BigQuery's storage API. Note that selecting this option will improve performance when interacting with your BigQuery tables, but may result in increased BigQuery costs.
- Test your database, then click Save.
To connect to a Databricks database, your account must have the following permissions:
BROWSE. Allows viewing and listing tables in the Database Browser.USE SCHEMA. Grants access to read data from schemas within the assigned scope.SELECT. Enables reading rows from tables within the assigned scope.
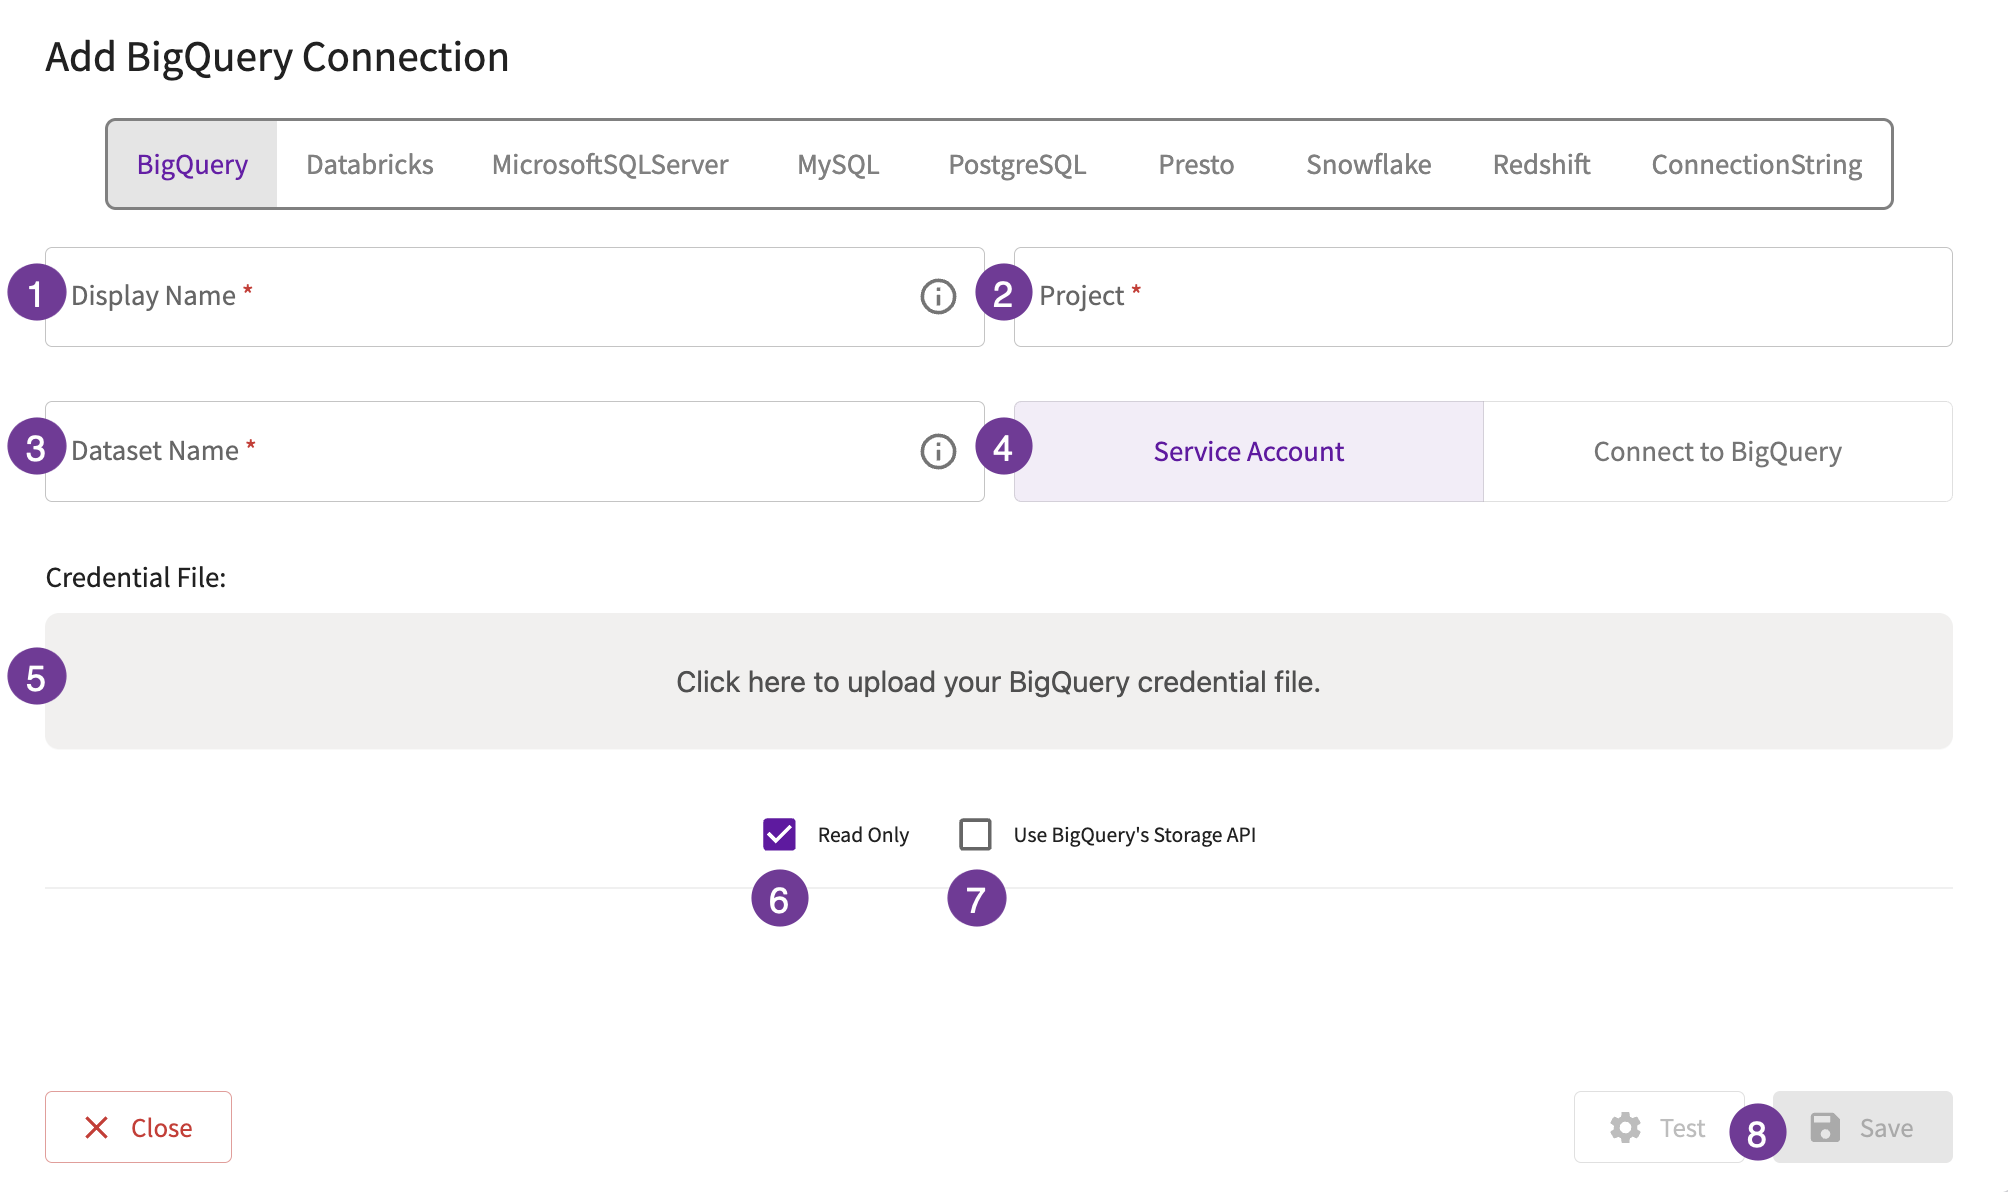
To add your Databricks database:
- Give the database a display name. This is how you'll reference the database across DataChat.
- In the Database field, enter the name of your Databricks database.
- In the Catalog field, enter the name of your Databricks catalog.
- In the Hostname field, enter the hostname or IP address of the database.
- In the Port Number field, enter the port for the database.
- In the HTTP Path field, enter the URL needed to connect to the database.
- In the Access Token field, enter the access token needed to connect to the database.
- Optionally, set the database to be read-only.
- Test your database, then click Save.
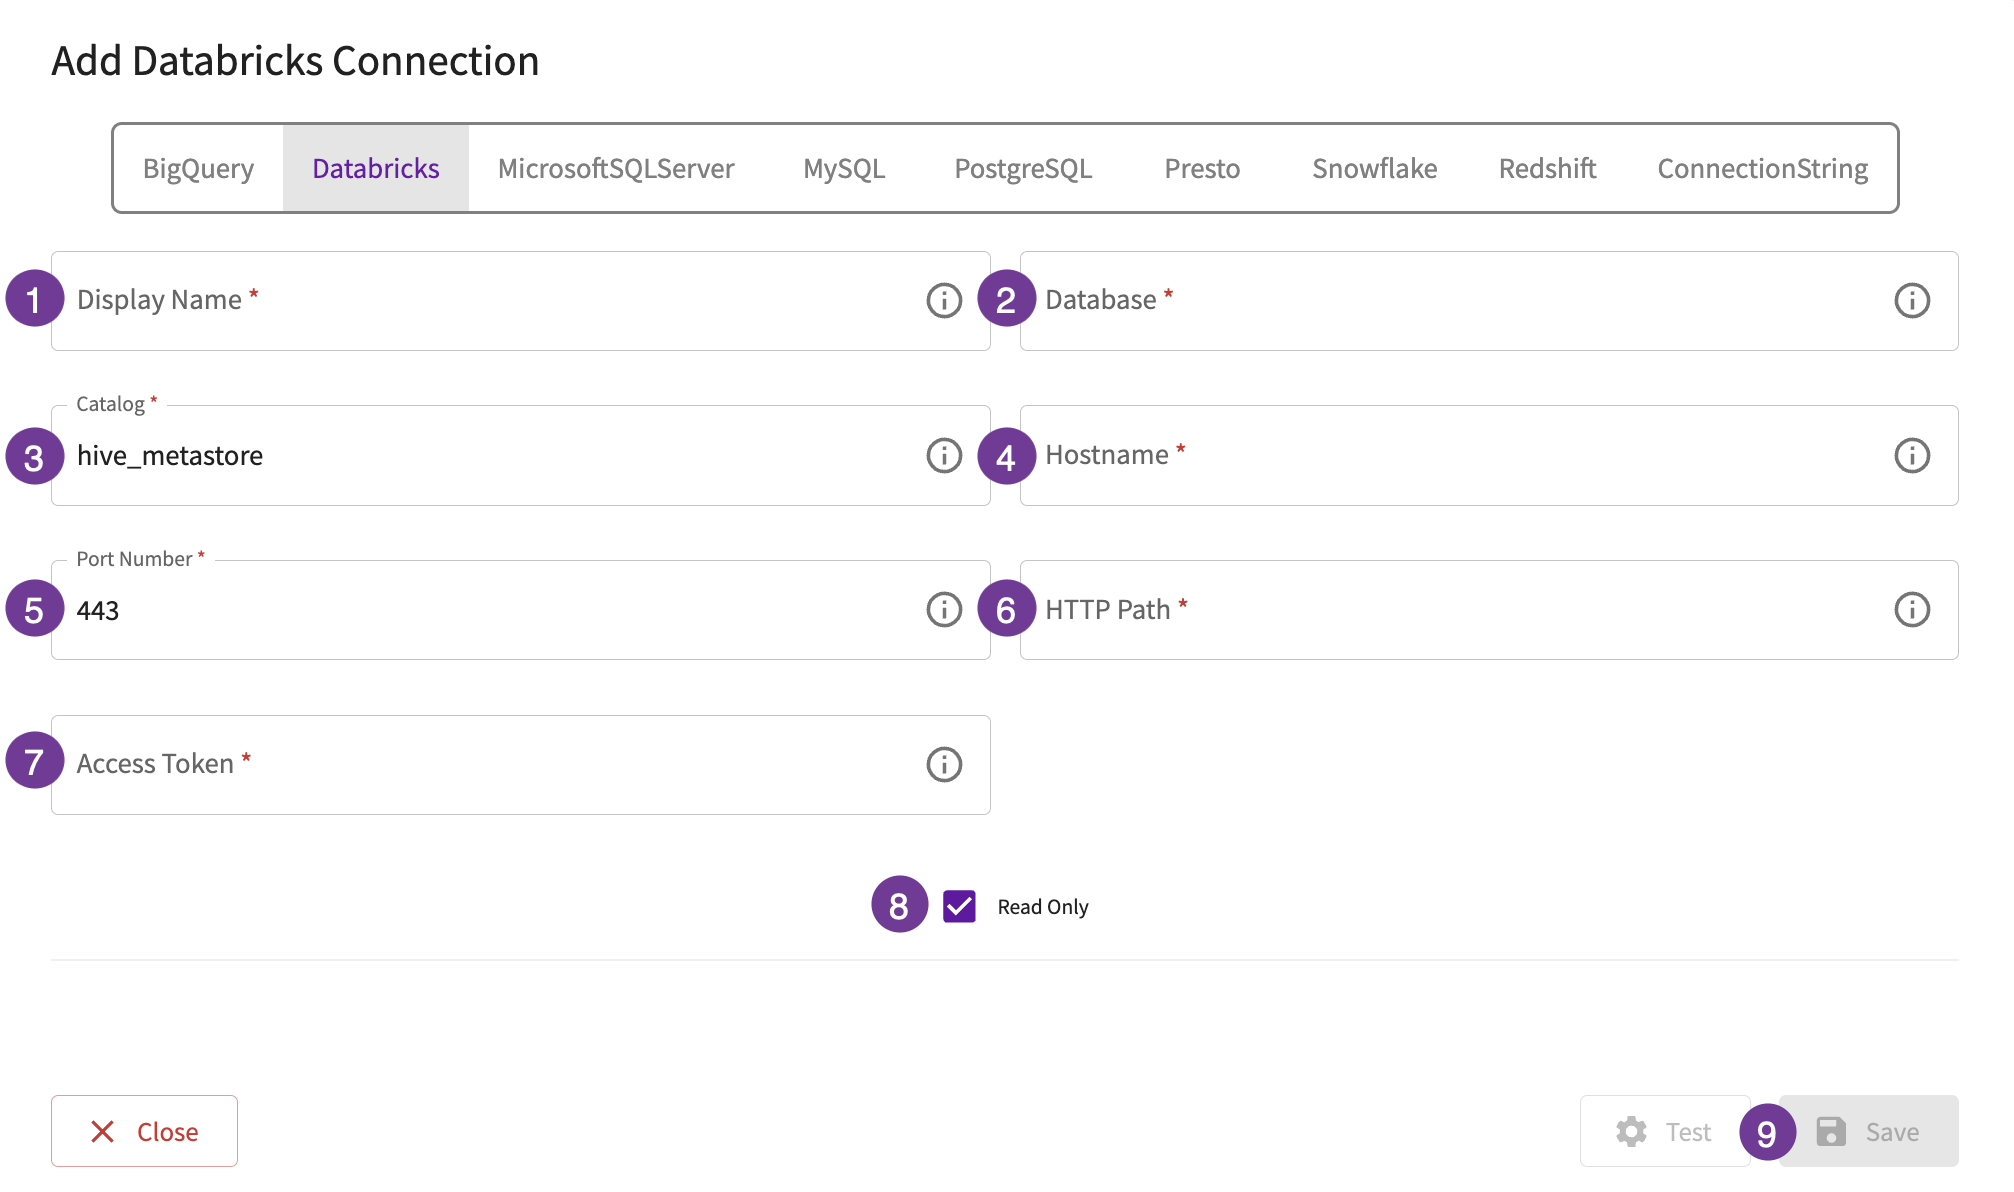
To add your MicrosoftSQLServer database:
- Give the database a display name. This is how you'll reference the database across DataChat.
- In the Database field, enter the name of the database itself.
- In the Host Name field, enter the hostname or IP address of the database.
- In the Port Number field, enter the port for the database.
- In the Username field, enter the username needed to connect to the database.
- In the Password field, enter the password needed to connect to the database.
- Optionally, set the database to be read-only.
- Test your database, then click Save.
DataChat requires using MySQL version 8 or later for best results.
To add your MySQL database:
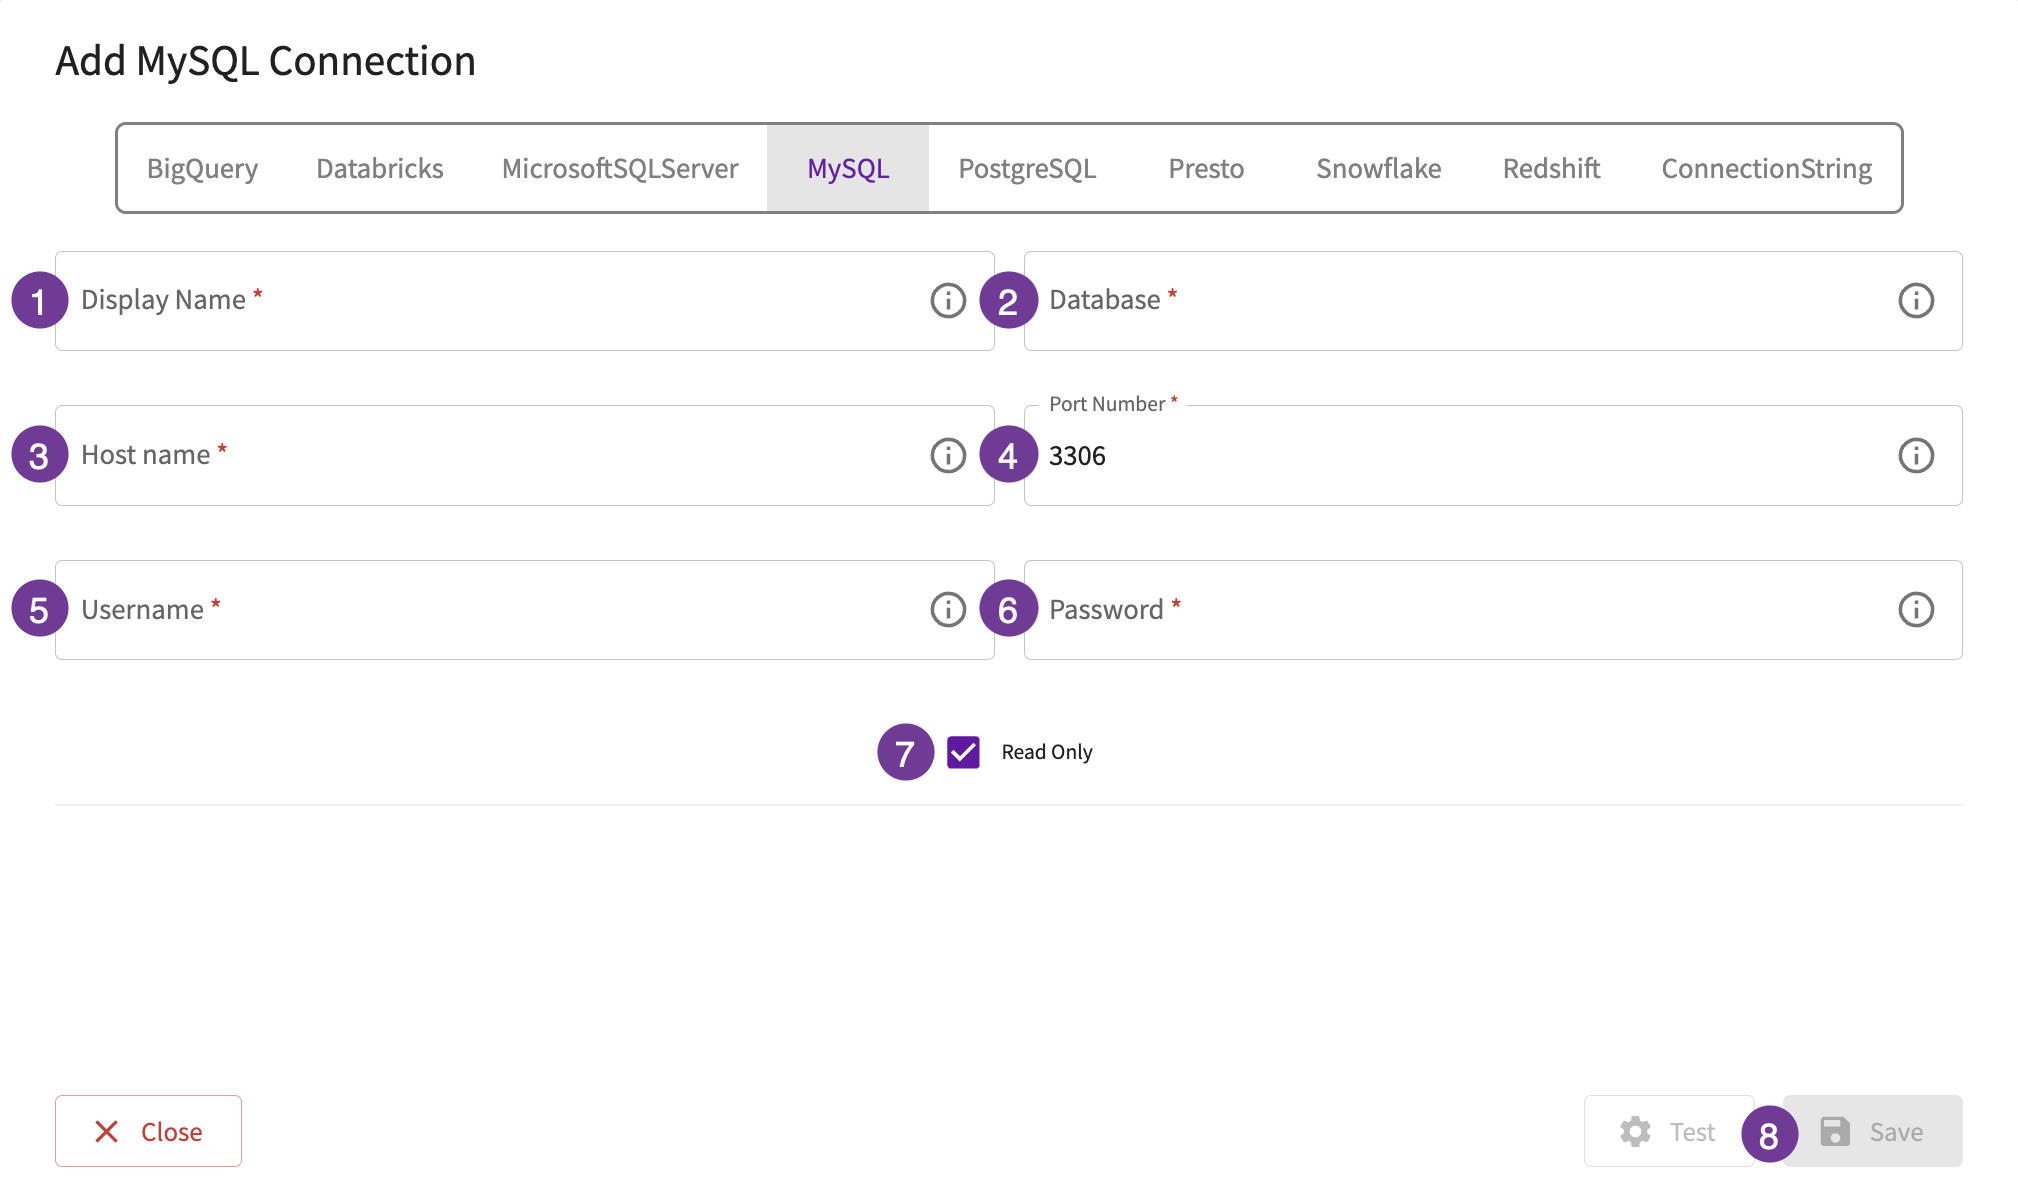
- Give the database a display name. This is how you'll reference the database across DataChat.
- In the Database field, enter the name of the database itself.
- In the Host Name field, enter the hostname or IP address of the database.
- In the Port Number field, enter the port for the database.
- In the Username field, enter the username needed to connect to the database.
- In the Password field, enter the password needed to connect to the database.
- Optionally, set the database to be read-only.
- Test your database, then click Save.
To add your PostgreSQL database:
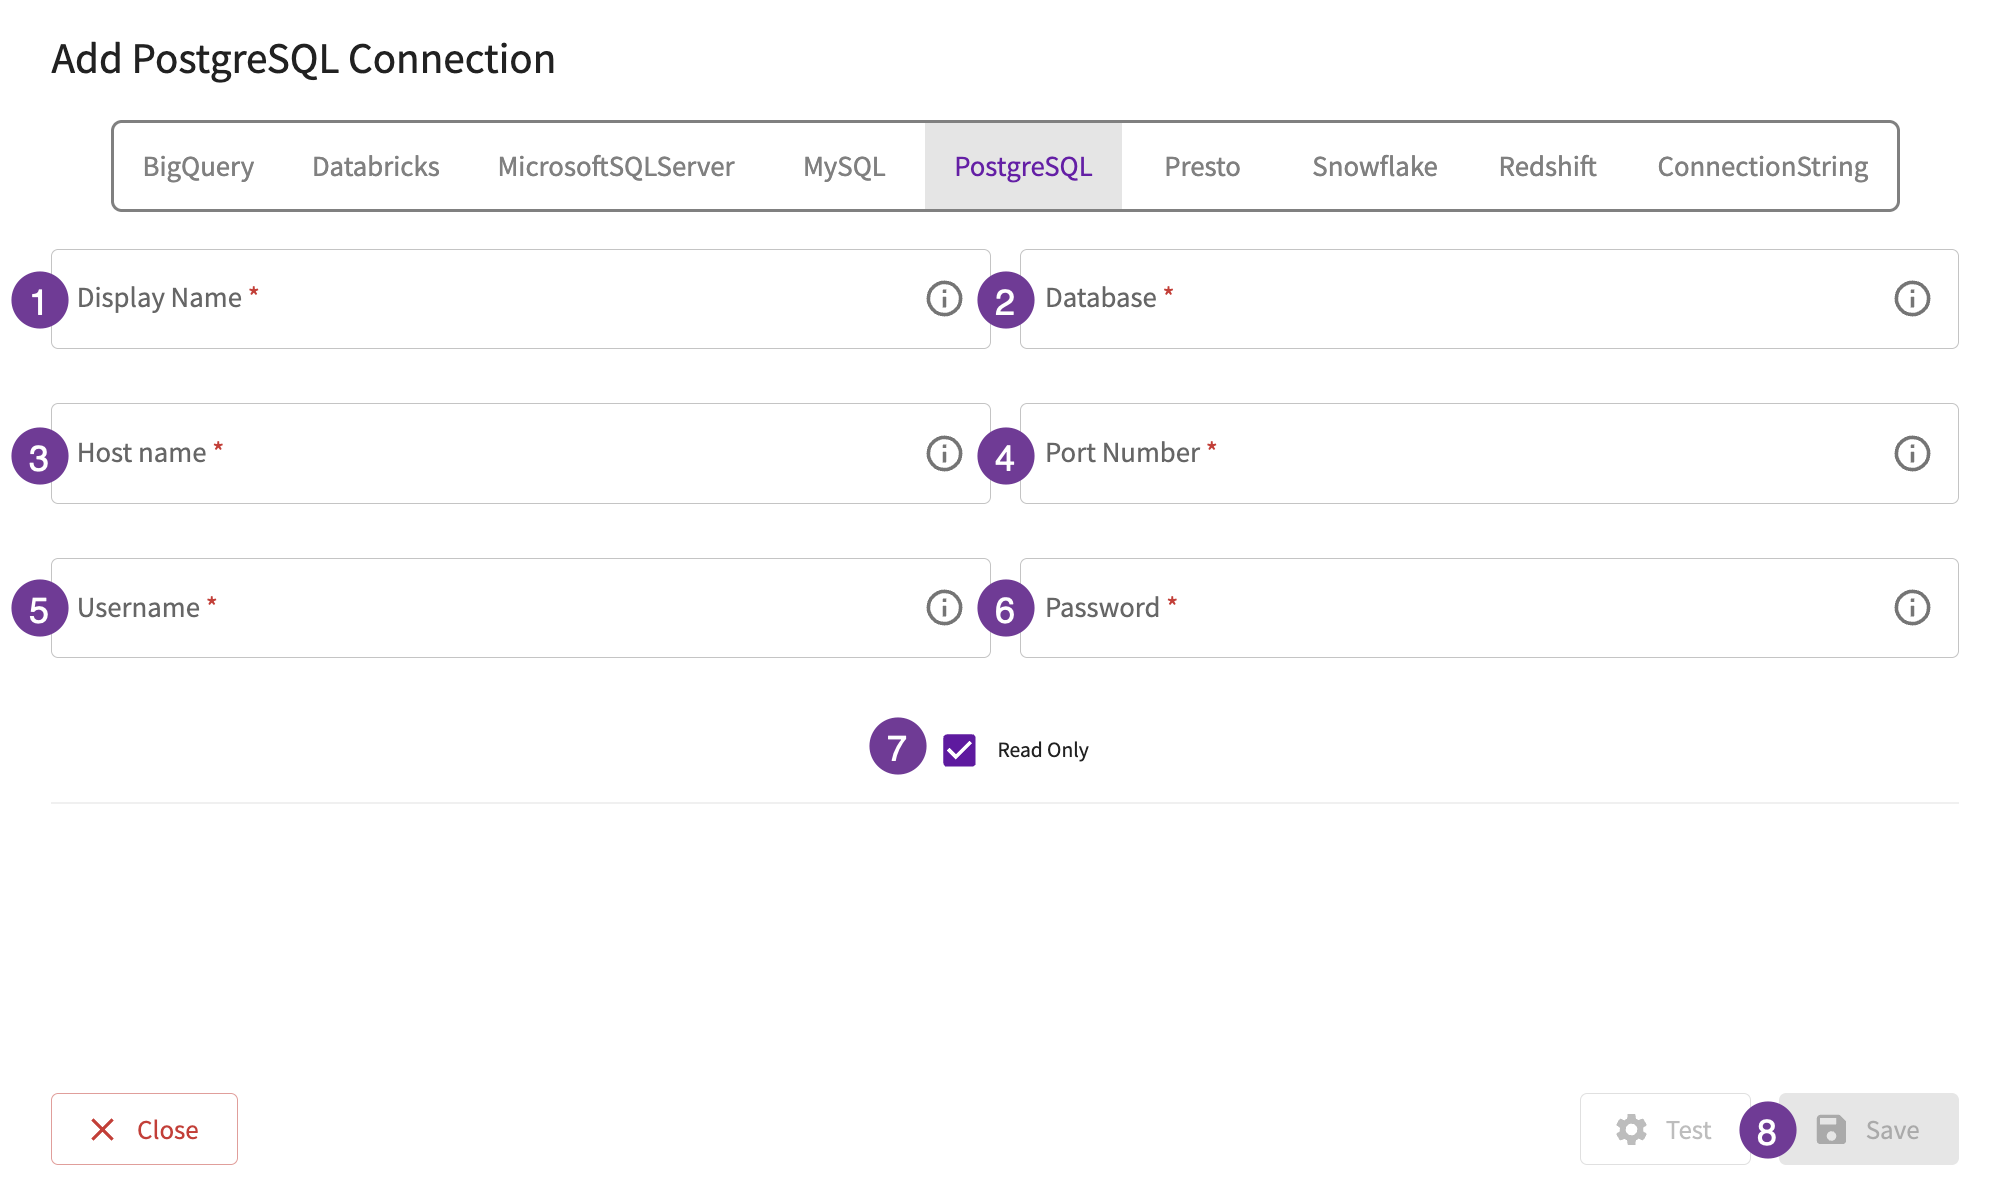
- Give the database a display name. This is how you'll reference the database across DataChat.
- In the Database field, enter the name of the database itself.
- In the Host Name field, enter the hostname or IP address of the database.
- In the Port Number field, enter the port for the database.
- In the Username field, enter the username needed to connect to the database.
- In the Password field, enter the password needed to connect to the database.
- Optionally, set the database to be read-only.
- Test your database, then click Save.
To add your Presto database:
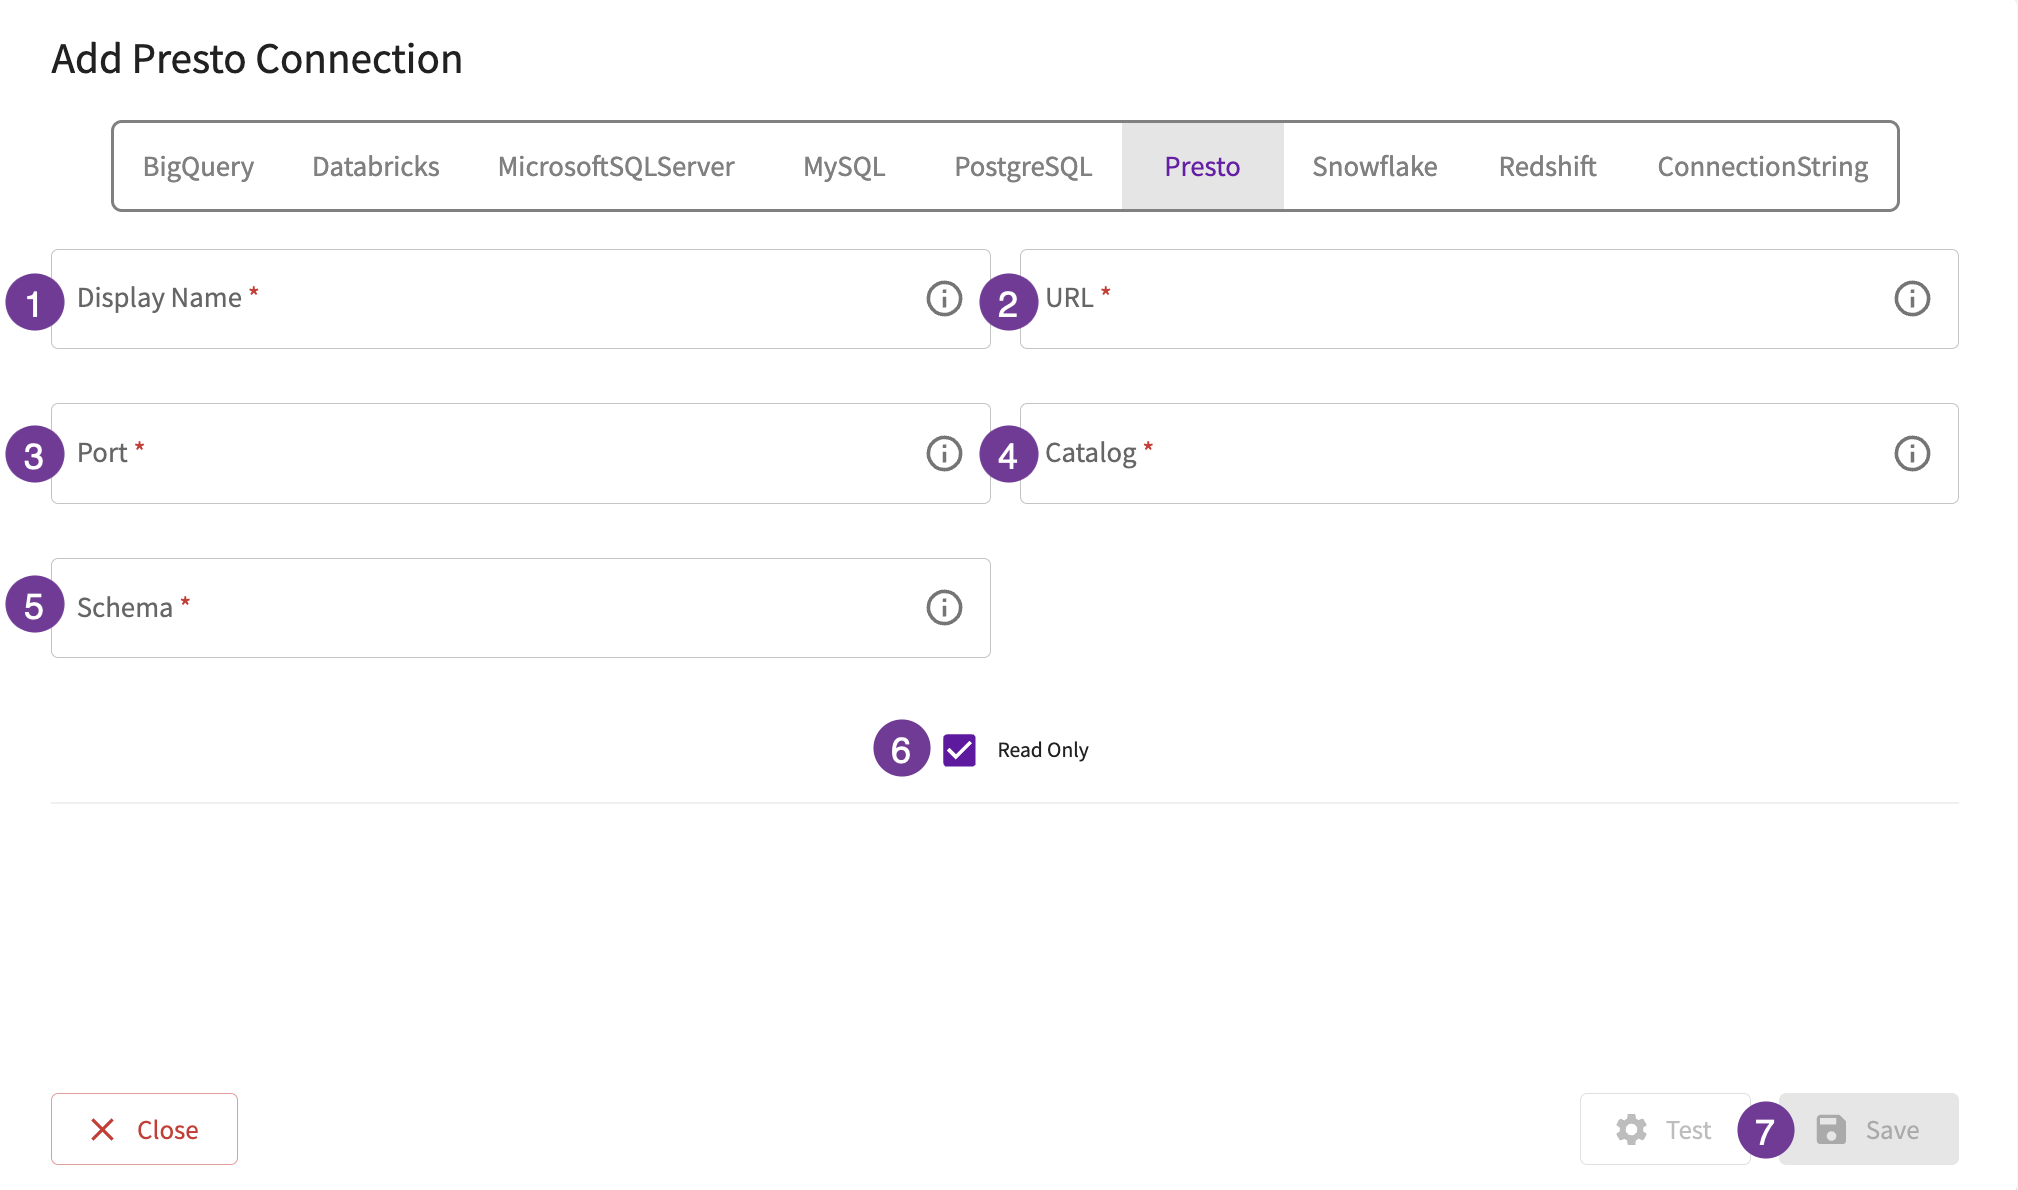
- Give the database a display name. This is how you'll reference the database across DataChat.
- In the URL field, enter the URL for your database.
- In the Port field, enter the port your database is using.
- In the Catalog field, enter the catalog to use.
- In the Schema field, enter the schema to use.
- Optionally, set the database to be read-only.
- Test your database, then click Save.
To connect to a Snowflake database, your account must have the following permissions:
-
USAGEon the database and schema. This allows:- Viewing database details using
SHOW DATABASES. - Viewing schema details using
SHOW SCHEMAS.
- Viewing database details using
-
SELECTon individual tables. Grants the ability to read data by executingSELECTstatements on tables.
If broader access is needed, you can grant the permission ALL on the table, database, or schema, which will grant every permission except ownership.
To access Snowflake via OAuth, refer to Enable Database OAuth.
To add your Snowflake database:
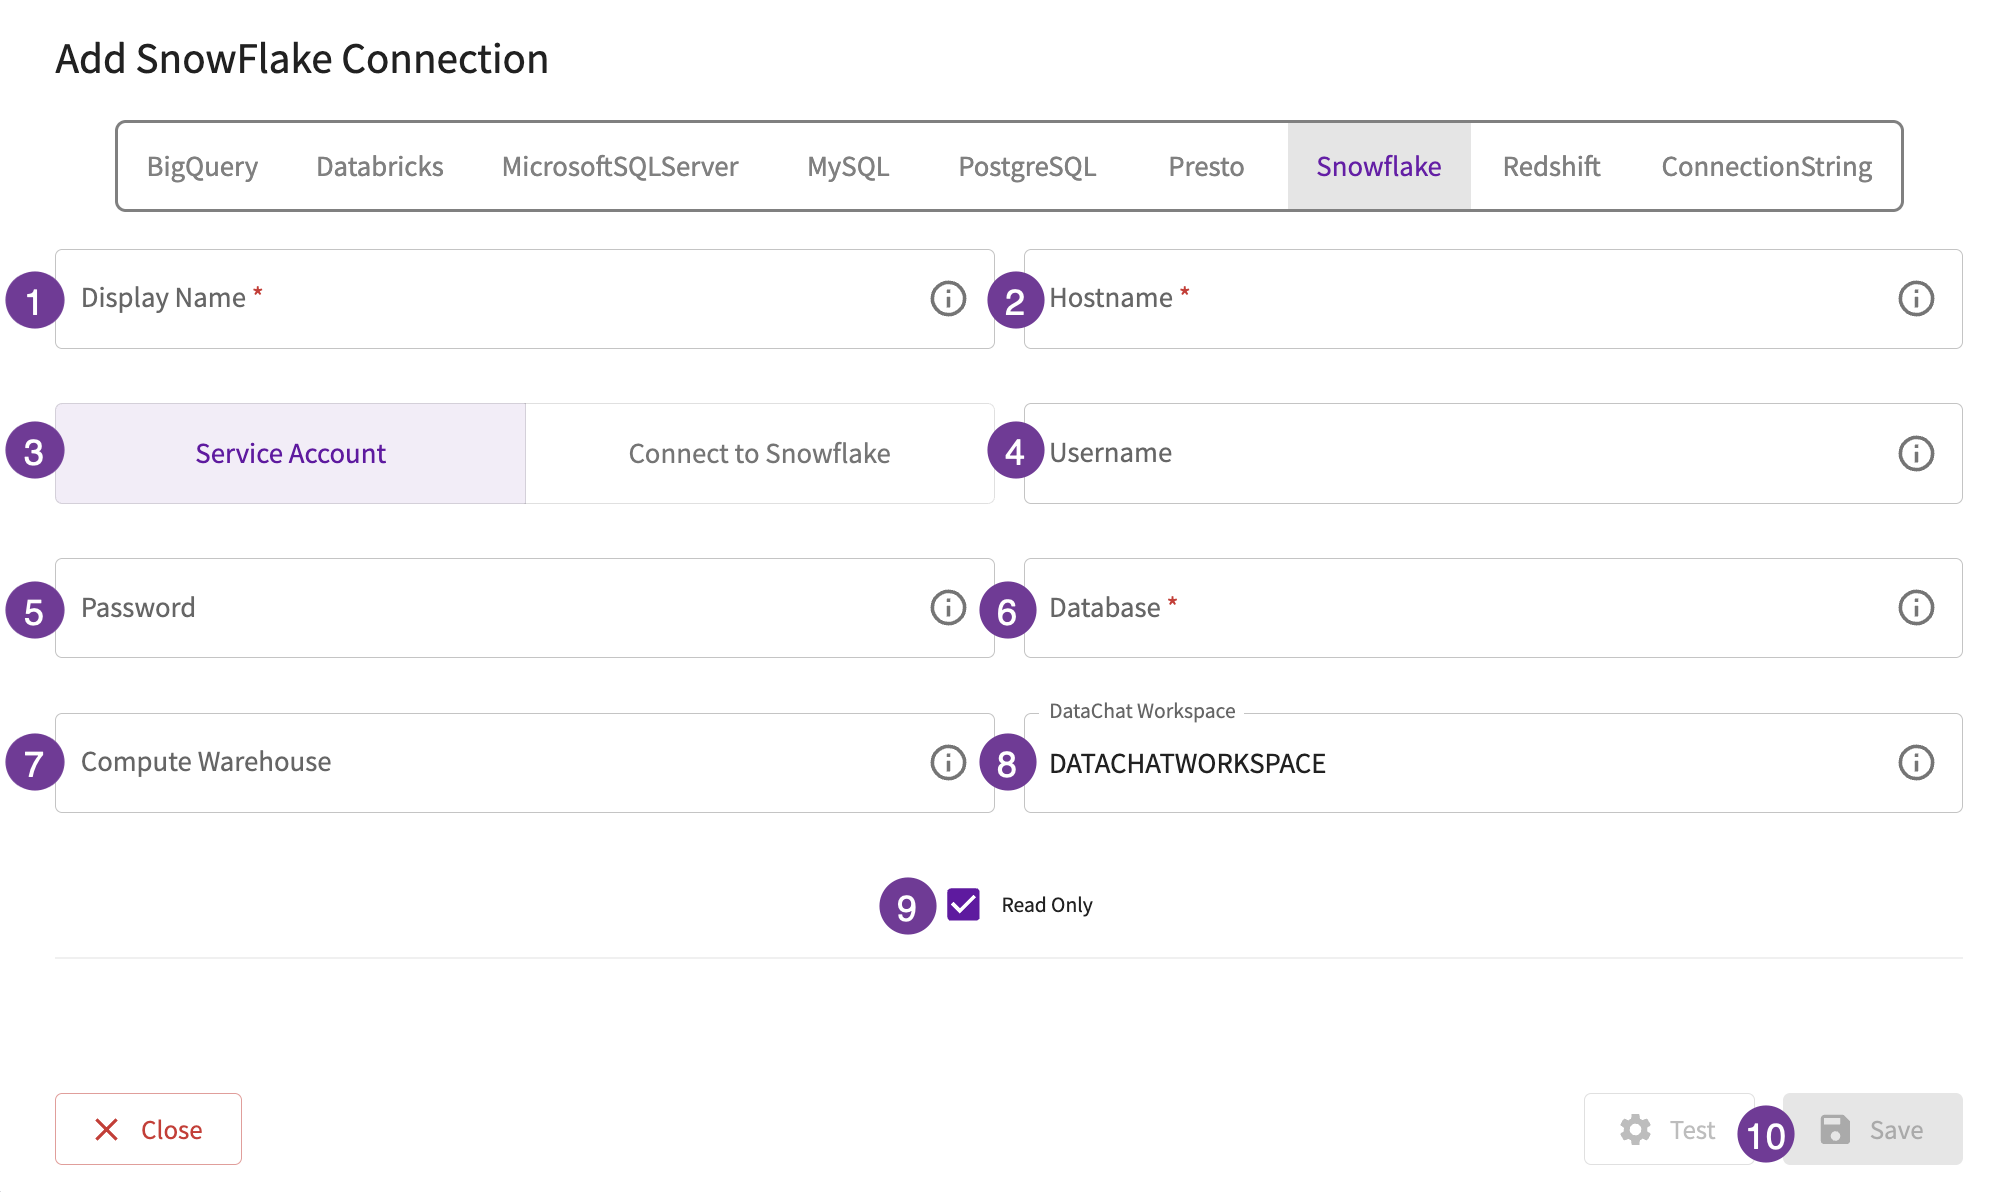
- Give the database a display name. This is how you'll reference the database across DataChat.
- In the Hostname field, enter your account identifier.
-
- Select whether this connection will use a service account or connect to Snowflake via OAuth.
- In the Username field, enter the username needed to connect to the database.
- In the Password field, enter the password needed to connect to the database.
- In the Database field, enter the name of the database.
- In the Compute Warehouse section, optionally set the Compute Warehouse field – enter the default warehouse to use.
- Optionally, set the DataChat Workspace field – enter the name of the workspace to use. A workspace is similar to a schema in other database systems.
- Optionally, set the database to be read-only.
- Test your database, then click Save.
To connect to a Redshift database, your account must have the appropriate permissions:
-
Table-specific access. To grant access to a specific table, run:
GRANT SELECT ON TABLE public.my_favorite_table TO my_new_user; -
Schema-wide access. To grant access to all tables within a schema, run:
GRANT SELECT ON ALL TABLES IN SCHEMA my_favorite_db TO my_new_user;
If the Redshift instance is within a Virtual Private Cloud (VPC), external users must connect via a VPN or a similar secure network solution.
For more details, refer to AWS documentation:
To add your Redshift database:
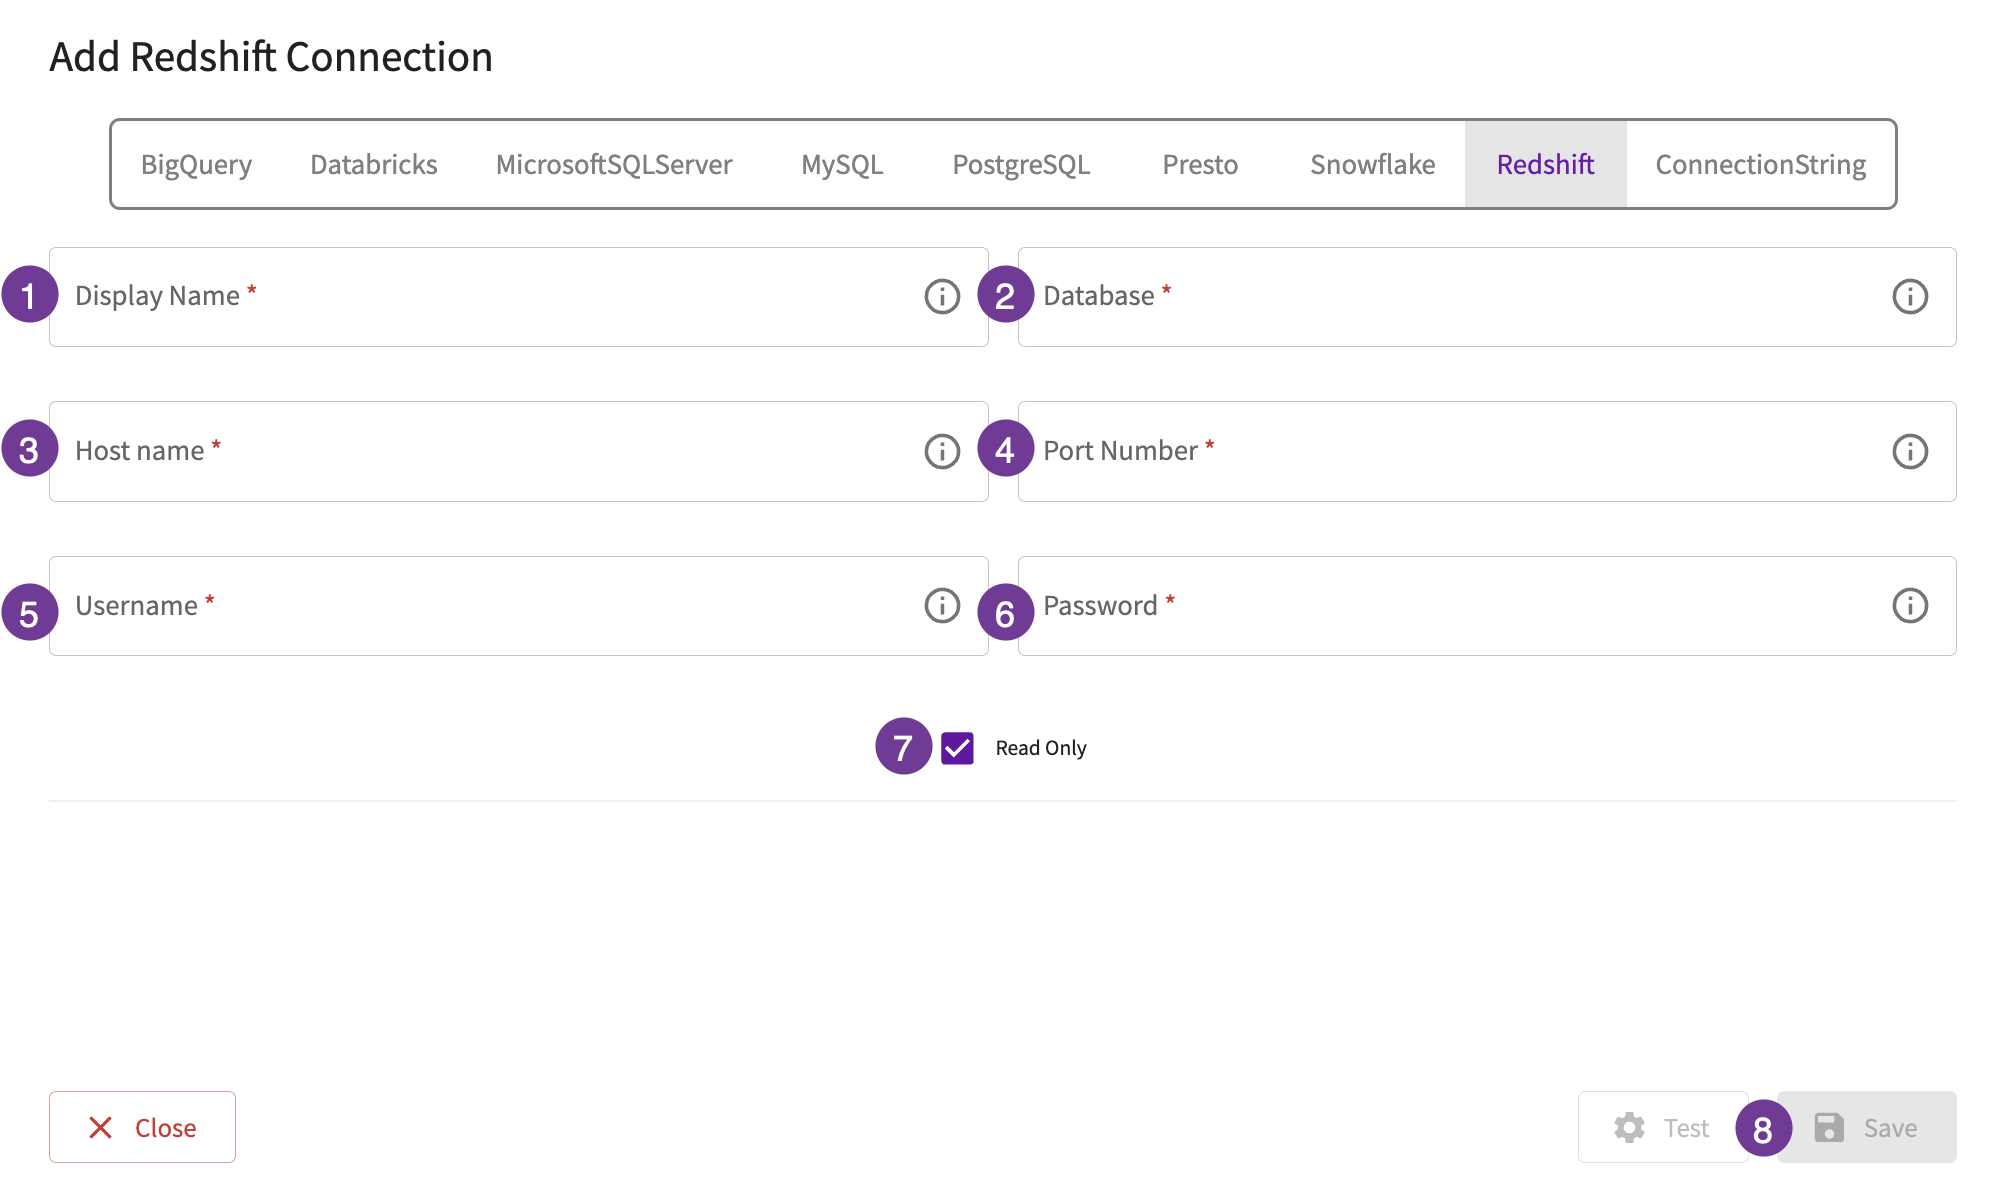
- Give the database a display name. This is how you'll reference the database across DataChat.
- In the Database field, enter the name of the database itself.
- In the Host Name field, enter the hostname or IP address of the database.
- In the Port Number field, enter the port for the database.
- In the Username field, enter the username needed to connect to the database.
- In the Password field, enter the password needed to connect to the database.
- Optionally, set the database to be read-only.
- Test your database, then click Save.
You can use a raw connection string to connect to a database of your choosing. Ask your administrator if it's provided by your organization.
To add your connection string database:
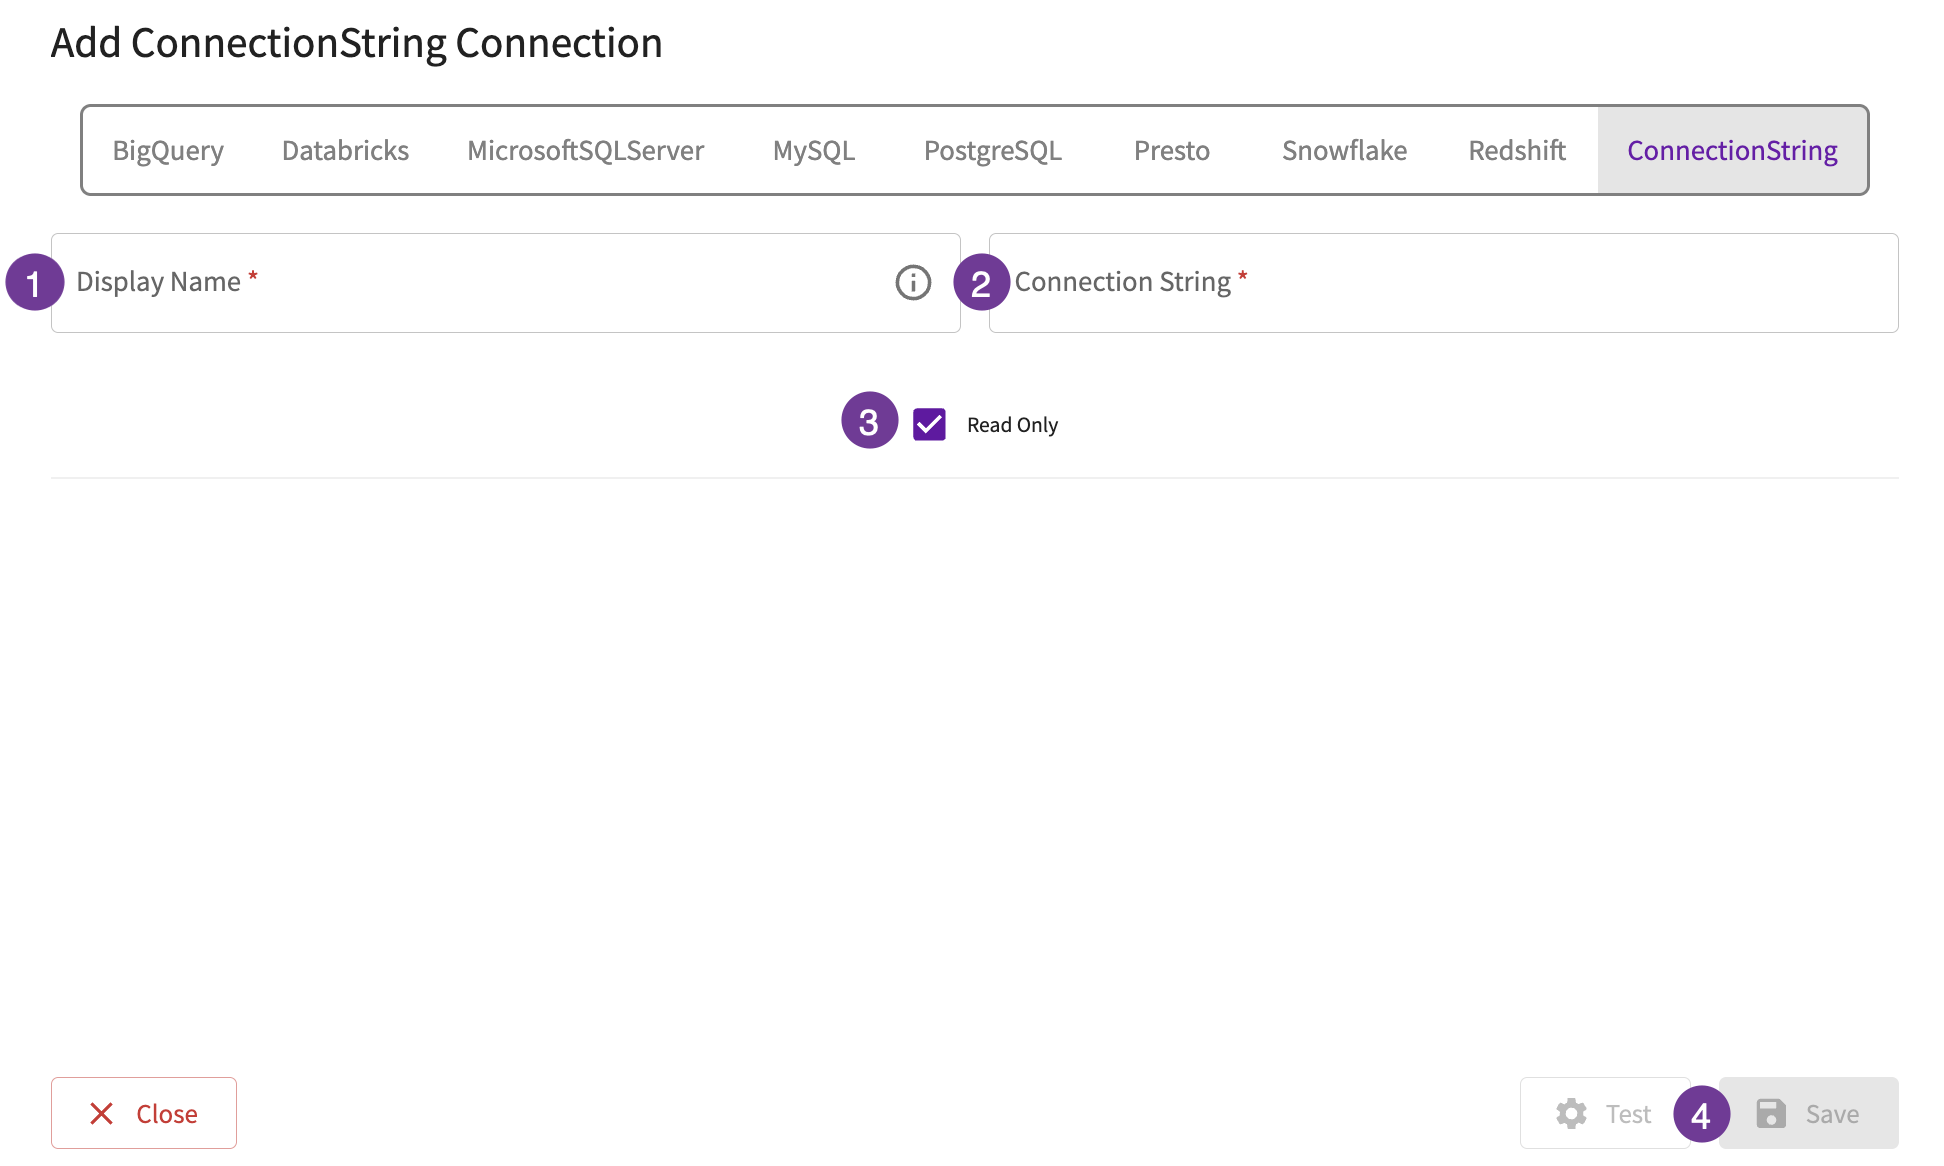
- Give the database a display name. This is how you'll reference the database across DataChat.
- In the Connection String field, enter the connection string needed to connect to the database.
- Optionally, set the database to be read-only.
- Test your database, then click Save.
For example, if you'd like to connect to a MySQL or SQL Server database, you could enter something like mssql://<username>:<password>@<hostname>:<port>/<database name>?Encrypt=yes&TrustServerCertificate=no&Connection+Timeout=5
For questions about database support, reach out to your DataChat administrator.
Load from a Database
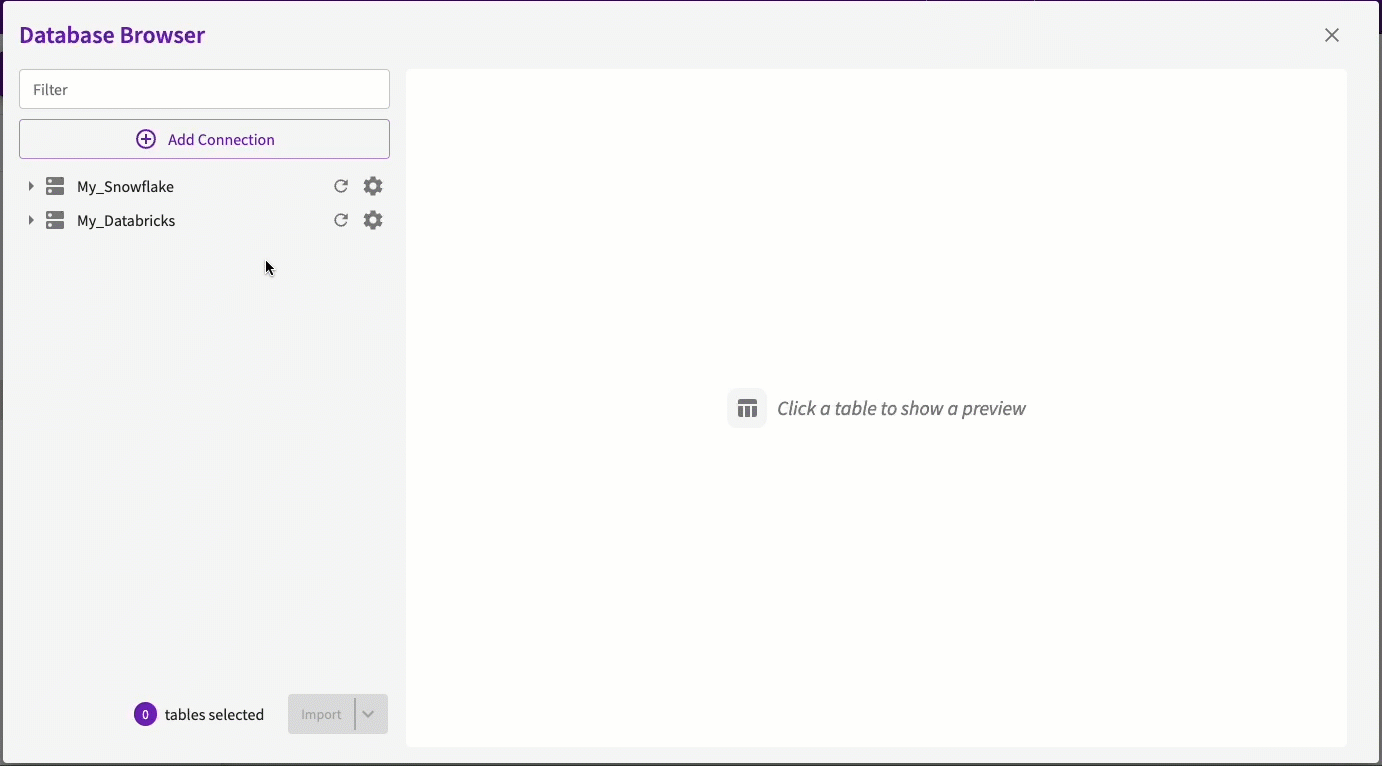
After connecting to a database, they appear on the left side of the Database Browser. From here, you can:
- Switch between databases by clicking the connection name.
- Optionally, add filters to search for a specific table.
- Optionally, refresh the database schema by clicking the Refresh button.
- Select the tables you'd like to open. Optionally, you can expand table to view column information, or preview a dataset by clicking on it.
- Click Import to create dataset objects or click Import and Load to automatically load the datasets into a session.
Sizeable database schemas can cause the Database Browser to time out. If you encounter this issue, reach out to your database administrator to access a more manageable version of the database. Otherwise, you can load from the database within a session.
Edit a Database
To edit a database:
- Double-click the database to edit, or select a database and click the Edit button from the toolbar or right-click menu. The Database Browser opens.
- Make your edits and click Save.
- To edit additional database connections, click the gear icon next connection to edit from the list of database connections.
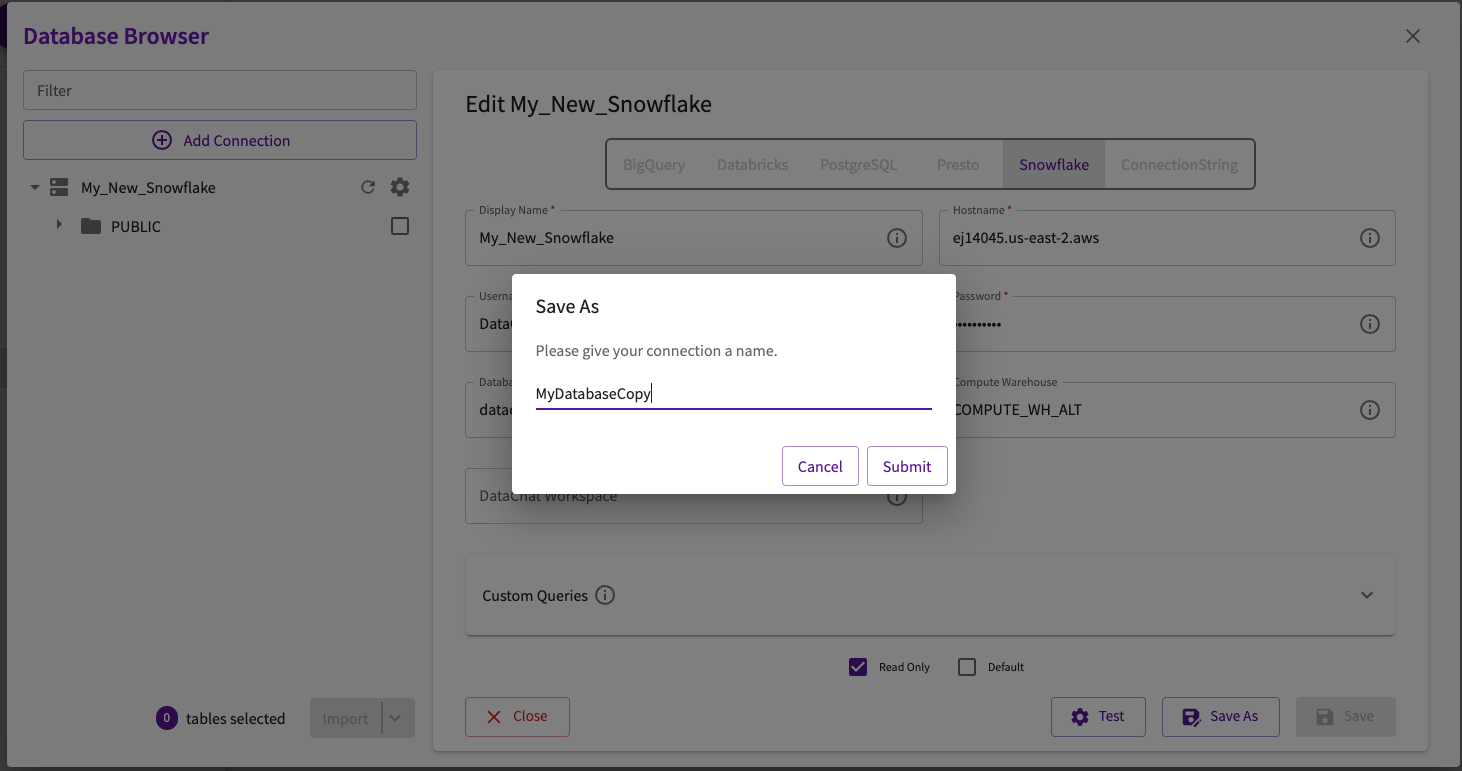
Save a Copy of a Database
To save a copy of an existing database, navigate to the homepage:
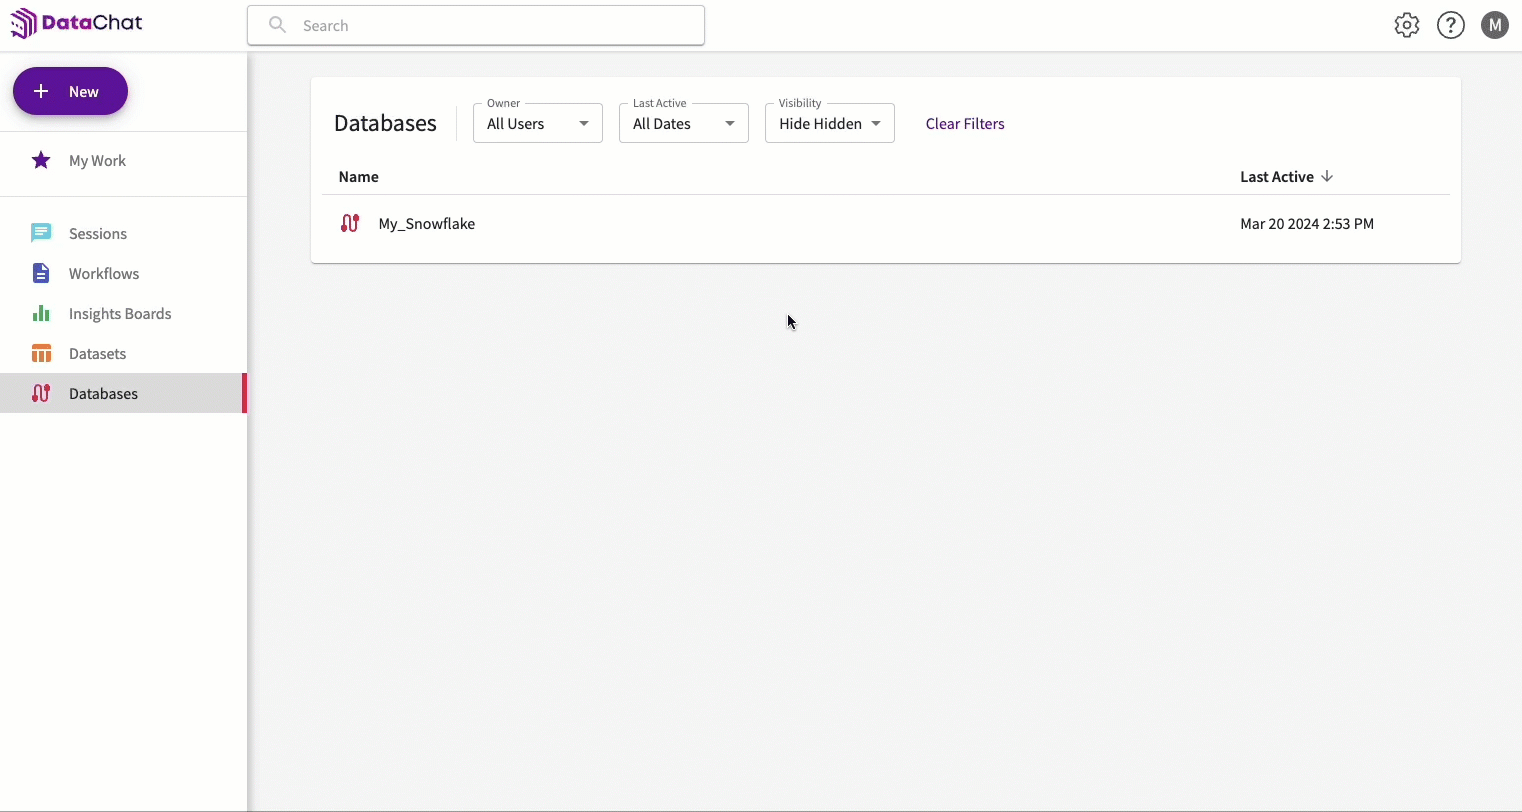
- Click Databases in the sidebar. You can also find your databases in My Work.
- Select the database to save a copy of.
- Click Edit Database. The Database Browser opens. You can also right-click on a selected database and click Save As and enter a new name for the copy.
- Click Save As and enter a new name for the copy.
Within a Session
To connect to a database while in a session:
- In the Data tab, select Add Dataset > Connect in the skill menu. You can also click New Dataset > Connect if data has not yet been loaded.
- This opens the Database Browser, where you can connect to your database
To load datasets from an existing database connection, refer to Load Datasets into a Session
Additional Database Connection Information
Computation Execution
Computations are executed within your specific database environment. This approach utilizes the database's processing power, ensuring that operations are performed close to the data source, minimizing data transfer and improving performance.
Read-Only vs Writeable Connections
Generally, most database connections in DataChat will be configured as read-only. This is designed to protect your data integrity. If a DataChat skill requires moving data to a new location, such as joining two datasets from different database platforms, DataChat copies the data to its own internal compute engine rather than writing to your database connection.
For writeable connections, DataChat optimizes the performance of skills such as Join and Bin by writing the data directly to your external database as a table or view. This is typically isolated in a dedicated schema or namespace to keep the results separate from other data.
Data written to external databases is cleaned up when your session is deleted unless you've saved an object to the homepage or published an object to an Insights Board.